Monday, November 23, 2009

flash email card for christmas

Once again, we come to the Holiday Season! From home to home, and heart to heart, from one place to another, the warmth and joy of Christmas brings us closer to each other.

Making Holiday greeting cards is really a work that takes time. Lots of love you need to put into the cards. It recalls the half-forgotten faces of friends I used to cherish, and loves I used to know.

Email flash and Christmas greeting flash e-cards which include the pictures of your friends, your family and your children, are the most personalized Xmas greeting e-cards you can send.

An email flash e-card is an interactive greeting flash card that you can send via email:

  • 1. Cards email free and unlimited, save you postage and expensive paper cards.
  • 2. An email flash e-card can along with animation and music when you send your Christmas flash greetings .
  • 3.There are plentiful well designed flash templates.
  • 4.You can create an email flash greeting Xmas e-card in 5 minutes.
  • 5.Send it to anywhere at any time.


  • Created by Wondershare Flash Gallery Factory


    Step 1: Install Email Flash making software
    Click here to download and install Flash Gallery Factory

    Step 2: Import photos and music to Email Flash
    Photo is the most important material to make up a good-looking Email Flash. It's a good idea to use your most favorite photos to your email flash greeting e-card. You can import the photos which are pre-processed by professional Image Processing Tool,like Photoshop, or just import the photos then process them with the built-in editing tool, which include some basic functions like crop, rotate, filter, etc

    flash presentation slideshow


    Step 3: Choose the e-card template for email flash

    Current template which is displayed in the preview window will be used as template for the email flash greeting e-card.Once the template is applied, you can go to Decorate tab window to add some decorations or directly publish the Christmas email flash e-card.


    Add effects to pictures


    Step 4: Select Transition Effects for email flash e-card

    Transition effect is the effects displayed between two adjacent photos. It makes the transition between photos smooth and good-looking. Click one transition effect and preview its result in the preview window on the right hand side.


    Screenshot of various output format


    Step 5: Decorate your email flash e-card
    Text is the most basic elements you can add to your email flash. An occasion as warm as Christmas has rightly inspired wonderful thoughts and nice quotes on it. A quotation is filled with wisdom, emotion, tenderness and thought. If you have no idea what to say, it's a good choice.

    Screenshot of various output format


    Step 6: Publish email flash

    Before starting to send flash via email using Outlook or Outlook Express, a flash file in SWF format must be created as usual. Therefore, you should specify file name and location for the SWF file.


    You should enter email address of desired people first and then click "Send" to start off. If you want to send your flash to many people in one time, simply enter all email addresses which are separated by semicolon ";". Or save the flash as swf then send it to your friends as attachment.


    email-flash


    Ok, that's done. An impressive email flash ecard is created in minutes.
    Monday, November 9, 2009

    How to make and print clip art card ?

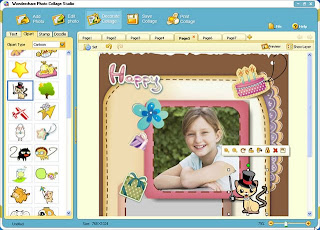
    Creating your own funny clip-art card isn't difficult and placing it on e-cards is also a straightforward process. If you really want to personalize your cards clipart and make someone smile or laugh at the same time, you're definitely on the right track with this ideas of card. The following steps outline how you can get started creating fun clipart for Thanksgiving day 2009 to send out to friends, family and co-workers. Here we take the Photo Collage Software for an example.
    Download the Photo Collage Software First

    Part 1: Make Fun Clip Art Card

    Brainstorm your clipart design ideas of card by sketching or doodling them in a sketchbook using colored pencils. Silly or goofy designs can often be the most amusing. Ironical ideas card or witty clip-art carddesigns can also be quite funny and memorable. Remember that the goal is to create clip-art card to make someone smile when she opens the clip art card, so the art shouldn't be too involved. It's best to avoid anything distasteful.

    The first step in creating your clip-art card is selecting the individual pieces you want to use. This includes photos, clip art, stamps and text tabs. Each tab allows you to add a different type of cards clipart component. Simply choose the category you wish to view from the pull-down, then drag-n-drop the clipart cards or stamp you want in the same way that you added your images. Rotate, resize, crop and reposition each piece as you see fit. To add text, just switch to “Text” tab, and click ‘New Text” and then type your text in the text box. You can also set your font, size, style, alignment and color. Check the Shadow box to add a shadow to your text.
    clipart card

    Part 2: Print your Clipart Cards

    In Print Clip Art Card tab window, you can print your cards clip art directly using the print tool in Photo Collage Studio. Before that, you could specify settings about how to print your clipart.

    1. Select Page

    If you have create many pages of clip art card in one project and you want to print only some of clipart cards, you should select desired pages to print. To do so, click the button select_page to bring up a window to select pages from. By default, all pages would be checked to print. To print specified pages, you have to uncheck the pages you don't want. Make sure that only the pages you want to print have the tick sign at the bottom left corner of each page thumbnail.

    2. Orientation

    Select page orientation of your clip art card on the top left hand side. By default, the orientation would be Portrait. Portrait works for most documents, which means its height is taller than its width. On the other hand, you can select to print your clipart page in Landscape orientation, which means its width is longer than its height.

    To make advanced settings for printing clipart, you can click button to open the setting dialog, in which options of Printer, Page range, Copies and so forth are available. You can even make in-depth parameters of selected printer by clicking "Properties" button beside the printer name drop-down list. See the printer manual for detailed information if possible.

    3: Lay-out

    The layout option allows you to select or customize the layout of your selected clip art card pages. For a fixed background, you can contain one, two, four or night pages in the same printed cards clip art page. Furthermore, you can make your selected clipart cards pages best fit the background or customize the layout yourself.
    As soon as all the settings have been done, you could print all your selected clip-art card pages now!
    layout

    how to make flash

    This simple flash making tutorial will show you how to make a simple, yet effective, slideshow-type 3D image gallery.It's easy and interesting and the process needs no flash or XML skills at all.

    Simple flash making is a good way to keep these precious thanksgiving activity memories as a flash keepsake, which can be used to enhance your photo presentation with stunning and colorful 3D effects.and share with friends and families on website, blog or MySpace.

    Thanksgiving is a holiday overflowing with joy .It's a wonderful time to take photos of family members and friends.As families gather, the cameras come out to capture magical moments of Thanksgiving activities to enjoy and share through the years!

    Here are a few tips to help you take memorable pictures that loved ones will thank you for.


  • Choose a medium to wide zoom lens


  • Use auto-ISO setting when you need it


  • Don't be afraid of the flash


  • Keep a respectful distance and be unobtrusive


  • Don't shoot people while they're eating


  • Wanna have a try now? Download the Flash Gallery Factory Free Trial Version to get started!


    Simple flash making step 1: choose the mode


    You may find that the software includes Gallery and Slideshow two modes. To make 3d flash gallery, please choose Gallery Mode.
    thanksgiving


    Simple flash making step 2: Import photos


    After selecting single or multiple photos, drag and drop them to the storyboard, which locates at the bottom of the interface. You are allowed to add up to 500 photos in one gallery. If you want to delete the photo, just right click on the photo and select "Delete Photo" item. If you want to add background music, just use the "Add music" built-in tool above the storyboard.

    thanksgiving


    Simple flash making step 3: Select 3d template


    Flash Gallery Factory 4.8 version provides 60+ free flash photo gallery templates including 25+ free 3d flash template.To make 3d flash curve screen gallery, please choose below template:

    Choose left down items to set background image or just change background color.
    thanksgiving


    Simple flash making step 4: Add image caption and description


    Click "Edit photo" button or double click on the photo and it will turn out a new window. Choose "Properties" Tab and click "Caption & Description" item to edit your image caption and description. Finally, click ok to close the window.

    thanksgiving


    Simple flash making step 5: Preview and publish


    Preview your 3d flash image gallery by click the start button in the bottom of the right screen. If you are satisfied with your work, you can publish your flash photo gallery to swf, html, exe, or screensaver formats, or you can mail the 3d flash image gallery to your friends directly as a gift.You can set an end hyperlinkas well by click the "Publish Setting", and select the "Action at the end of the show" to input your link.

    thanksgiving

    How to make thanksgiving flash gallery